Zucchini pickles

IMG_5991


Here’s what to do with the rest of the zucchini glut (self-inflicted, harvested or otherwise acquired), should you by chance having any kicking around your house or a few pounds leftover from last weeks lunch. These pickled zucchini are not mouth-puckering vinegary, they are savoury with a lingering note of distilled herbs and Indian spices, have a subtle sourness and just a whisper of sweetness – think of them as something along the lines of sweet & sour Indian bread-and-butter pickles. Imagine how good they will be with cooked ham, on a sandwich (oh, I should make pastrami), as a side to a cheese platter. Certainly will they be fantastic with turkey & chicken and provide an extra flavour-layer to the great noodle / rice / quinoa / farro bowls that we all will be eating for lunch now that the days are getting shorter.

In all their turmeric glory, they look pretty stunning, don’t they? The yellow, green & red just pop and bring back the summer colours when you get a jar out later in the year. Surely, they will liven up the darkest and dankest of days with their cheery colours and warm aromatic spices. The zucchini pickles are not spicy at all, so feel free to add a few chillies to cover that if you are so inclined. Continue reading

Orange marmalade

IMG_5155


I always thought making orange marmalade was fiddly & super difficult. Well, turns out, it’s rather easy and the most difficult thing about it is the shopping. Seville oranges are not your usual (German) supermarket fare, they are mostly sold at proper/specialty grocers, markets and in farm shops – my favourite places to shop anyway. So, if you see Seville oranges (the season is from end of December to February), buy, buy, buy like a 1980s stockbroker and ask questions later*.

Dark January & February evenings afternoons are perfect for preserving in general and seasonal citrus fruit in particular. Everything has slowed down, the rush of Christmas has passed, the days are starting to get longer again but are still grey and cold and frankly, miserable at times. The citrus scent is intoxicating – a promise of warmer, brighter days – Continue reading

green tomato, apple & zucchini chutney

IMG_4532


P.S. Recipe in English und Deutsch.

A recent visit to my Mum saw me return laden with a veritable bounty from her garden: several large zucchini / courgettes with aspirations to be full-grown marrows, apples, butternut squashes, lavender offshoots, super ripe tomatoes which hardly survived the journey and one giant white cabbage, where half of it still lingers in the fridge. I had bought green tomatoes to make us fried green tomatoes again and delayed, so they needed to be used too. The situation could have not been more auspicious for chutney.

I love preserving and the taste of a richly & warm spiced, fruity chutney is one of the most delightful things to be made from surplus of a summer’s glut or from what is normally thought of inferior un- or overripe produce destined for the compost. This green tomato & zucchini chutney is excellent with a strong-ish Cheddar and English biscuits or crackers for cheese. Continue reading

Hot cross buns


Hot Cross Buns – Korinthenbrötchen (deutsches Rezept am Ende)

Hot cross buns

In case you did not know, I am married to an Englishman, which has only furthered my Anglophilia and deeply rooted affection for extremely expensive paints & wall papers, Earl Grey tea with milk, P.G. Wodehouse, a fried breakfast, B&B’s, the countryside, picnics, the National Trust, Deborah Devonshire, British cuisine and to top the by no means finished list – a pinch of charming eccentricity.

Hot cross buns

In England, Hot cross buns are traditionally eaten on Good Friday (the cross symbolizes of course the Crucifixion). Maybe you know the nursery rhyme and song? A relative of the gorgeous Dutch Krentenbollen (soft currant buns, a sure thing to eat in Holland & bring a bag for my your Mum) these are firmer, saffron-golden and have a distinct and intense spiced taste. Other sources state that Hot cross buns have been served during the whole of Lent. I am a little bit puzzled how these rich golden buns, full of aromatic currants & expensive spices like saffron, cardamom, cinnamon, nutmeg, cloves & ginger could have been a daily occurrence and fit the concept of restraint (though once marzipan was considered a fast food!). The luxurious ingredients seem to me more the feast at the end, the break of the fast and beginning of the Easter celebrations.

Hot cross buns

I have failed these buns for years with some resembling fruitcakes (how to say it politely: not my thing), some turned out great – as building material, other recipes took the glazing a bit too far: a triple douse of apricot jam & sugar syrup??? Finally, Felicity Cloake presented How to cook the perfect Hot cross bun (not a moment too soon) and the next day I had several winners on my plate and never looked any other bun in the eye again: Only the tiniest of adaptations (e.g. I prefer a pure currant bun without mixed peel) and a few nips & tucks at the method.

Hot cross buns


Hot cross buns

Makes 16, adapted from Felicity Cloake’s Perfect Hot cross buns from the Guardian

update: the American cup measurements and weight in ounces are there now


200ml milk = ¾ cup + 2 tablespoons = 13½ oz
a few pistils of saffron (a good pinch)
¼ teaspoon freshly grated nutmeg
3 green cardamom pods, lightly bruised
1 cinnamon stick
2 cloves
20g fresh yeast (never made this with dried yeast, though substitute a sachet of 7g)
50g caster sugar = ¼ cup
450g strong white flour (bread flour or type 550 flour) = 3 cups = 16 oz
100g butter = 3.5oz = 1 stick minus 1 tablespoon
½ teaspoon salt
½ teaspoon ground ginger
3 (2+1) eggs
200g currants = 1 cup or 7 oz
3 tablespoons flour
1 tablespoon sugar
1 tablespoon hot water

Gently heat (do not boil) the milk, throw in the spices: saffron, nutmeg, cardamom, cinnamon & cloves and leave to infuse for a few hours. Warm again until tepid, strain and dissolve the yeast & feed it with a pinch of sugar.

Cut your butter into small pieces and add them to the flour into a large mixing bowl (or use a pastry blender), rub together, then mix with sugar, salt & ground ginger. Make a well in the middle, add the two eggs and beat with wooden spoon before you add the yeasty spiced milk and stir together. Continue kneading the dough by hand (at least 10 minutes) until soft & smooth. Add more milk if your dough seems too dry or hard to work. Grease a bowl, lift the dough into it & cover with a large plastic bag or tea towel and leave to prove until it has doubled in size (anything from 2 hours in warm place, more in a cooler area).

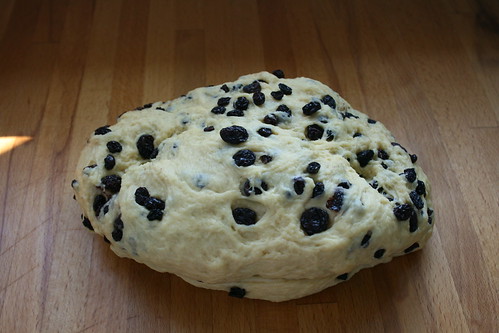
Briefly knead the dough on a flour-dusted counter & incorporate the currants until evenly distributed. Divide the dough into 16 pieces, roll those into buns (no need to count the currants in each one) and place onto lined baking sheets. Score the top crosswise, cover again with a large plastic bag and leave in a warm place to double in size.

Meanwhile preheat the oven to 200°C (400°F) and make an egg wash from the remaining egg with a little water or milk. Stir the flour with a miniscule amount of water into a really thick paste (like putty) and spoon this into one corner of a (tiny) plastic bag. Brush each bun with the egg wash and using your freezer bag as a piping bag (cut of the corner’s tip) draw crosses onto the buns. Bake for about 25 minutes until the buns are golden and the flour cross is still relatively white. Glaze them as soon as they are out of the oven with the tablespoon of sugar dissolved in the hot water, then leave to dry & cool.


Englische Korinthenbrötchen zum Karfreitag

16 Brötchen, Rezept adaptiert von Felicity Cloakes Rezept aus dem Guardian


200ml Milch
eine Prise Safranfäden
¼ TL Muskatnuss
3 grüne Kardamom Kapseln, leicht gestoßen
1 Zimtstange
2 Nelken
20g frische Hefe (ich benutze hierfür nie Trockenhefe, wenn gewünscht: 1 Paket à 7g)
50g Zucker
450g Mehl (Type 550)
100g gute Butter
½ TL Salz
½ gemahlener Ingwer
3 (2+1) Eier
200g Korinthen
3 EL Mehl
1 EL Zucker
1 EL heißes Wasser

Die Milch langsam erhitzen (nicht sprudelnd kochen) und darin Safran, Muskatnuß, Kardamom, Zimt & Nelken für mindestens 2 Stunden ziehen lassen. Danach die Milch wieder erwärmen (Körpertemperatur), durch ein Sieb gießen und dann die Hefe darin auflösen und mit einer Prise Zucker füttern.

Das Mehl und die in kleine Stücke geschnittene Butter in eine große Schüssel geben und zwischen den Fingern zerreiben (oder einen Teigmischer / pastry blender benutzen), dann Zucker, Salz und Ingwer hinzugeben und vermischen. In die Mitte eine Vertiefung machen und darin 2 Eier verquirlen. Die Hefemilch hineingießen und alles mit einem starken Holzlöffel verrühren bis ein weicher Teig entsteht. Danach mit den Händen (für mindestens 10 Minuten) kneten um einen glatten und elastischen Teig zu erhalten. In eine leicht gefettete Schüssel geben, mit einer großen Plastiktüte (oder einem Küchenhandtuch) abdecken und an warmem Ort zur doppelten Größe aufgehen lassen (mindestens 2 Stunden).

Den Teig auf eine bemehlte Arbeitsfläche geben und kurz durchkneten, dann die Korinthen einarbeiten bis sie sich gleichmäßig verteilt haben. 16 gleichgroße Brötchen formen und auf mit Backpapier belegte Bleche legen, wieder abdecken und aufgehen lassen bis sie ihre doppelte Größe erreicht haben.

Den Backofen auf 200°C vorheizen und das verbliebene Ei mit etwas Milch oder Wasser verquirlen. Aus dem Mehl und ganz wenig Wasser eine Paste formen (ähnlich wie Fensterkitt oder Knete) und in einen kleinen Plastikbeutel füllen. Die Korinthenbrötchen mit der Eiglasur bestreichen und anschließend eine dünnes weißes Mehlkreuz obenauf spritzen. Dazu von der Plastiktüte eine klitzekleine Ecke abschneiden und sie wie einen Spritzbeutel benutzen. Für ca. 25 Minuten backen bis die Brötchen goldbraun und die Mehlkreuze noch weiß oder nur leicht gebräunt sind.

Sofort mit der Zuckerglasur (1 EL Zucker in 1 EL heißem Wasser auflösen) bestreichen, dann trocken, abkühlen lassen und essen: sehr lecker mit Butter & einer guten Tasse Tee.


Wild garlic pesto

I imagine you are basking in spring sunshine as well (mixed with a few cloudy days now and then) and are buying every green shoot & leaf on the markets yourselves. A while ago I had a quick chat with Sophie James about a pesto with wild garlic and the thought has not left my mind.

Bärlauch- or Wild garlic pesto

Thankfully ramsons or German: Bärlauch are abundant now and I made a few batches experimenting with different nuts. Astonishingly walnuts, which I had imagined as a brilliant contender, completely killed of the sharp grassy & herby taste of the wild garlic and basically bulldozed flattened the pesto. Tja, next. Blanched almonds worked well, though, in my book nothing beats the creamy smoothness that pine nuts can give to a pesto. Always a stickler for proper pesto making (pestle & mortar), in dealing with wild garlic, I prefer the rapid pureeing powers of the blender to preserve the (almost neon) vivid green colour.

Now, what to do with those jars of wild garlic pesto? They look tiny now, but contain a concentrate and a little goes a long way. Plus, the Bärlauchpesto packs quite a punch and sports a certain sharpness, so it is in need of proper vehicles:

  • Good company to grilled lamb chops (serve with these lemony giant beans & fennel with dill)
  • Lunch of artichokes: mix a spoonful with mayo & more lemon juice for a grassy green dip to dunk each artichoke leaf and lick your fingers afterwards
  • Of course pasta: linguini with wild garlic pesto for a light supper
  • Any grilled meat, fish, vegetables like peppers, green asparagus, corn…
  • Knead into some butter for a quick compound butter to melt on your Sunday steak (oh, that was quite the thing & I might never make ordinary garlic butter again)
  • Make wild garlic bread: spread between barely cut baguette, wrap in foil and bake – yum
  • We tried these as garlic shoestring fries as well…

You can smell our house from space.


Wild garlic pesto

for two small Weck jars (140ml)

a bunch of wild garlic (just the leaves weighed 130g in the end)
50g (¼ cup) pine nuts, toasted in a dry pan
40g (1.5 oz) Parmigiano reggiano or Grana pardano, grated
salt
lemon juice
olive oil

Roughly chop the wild garlic and blend (only a short burst) them together with the pine nuts. Add the cheese, some salt, a spritz of lemon juice and some olive oil to the blender and give it another quick blitz & adjust the seasoning to your taste. Add more oil if you are using the pesto right away to achieve a runnier consistency. Otherwise (if you want to store an amount for a couple of days or more – ours was good for 2 weeks) spoon the concentrated paste into small jars while making sure no bubbles are visible throughout and top with a layer of olive oil to prevent discolouring. Store in the fridge until used.
Bärlauchpesto

genug für zwei kleine Weckgläser (140ml)

1 Bund Bärlauch (nur die Blätter wogen 130g)
50g Pinienkerne, in einer trockenen Pfanne getoasted
40g Parmigiano reggiano oder Grana pardano, gerieben
Salz
Zitronensaft
Olivenöl

Den Bärlauch grob hacken und zusammen mit den abgekühlten Pinienkernen nur kurz in einem Blender oder einer Küchenmaschine zerkleinern, dann den Parmesan, etwas Salz, einen Spritzer Zitronensaft und etwas Olivenöl hinzugeben und wieder nur in kurzen Intervallen hacken (es sollte kein Püree werden) & nach Geschmack nachwürzen. Will man das Pesto sofort essen, mehr Öl hinzugeben um eine etwas flüssigere Konsistenz zu erhalten, will man es aber ein paar Tage aufbewahren, dann sollte man die konzentrierte Paste in ein kleines Glas löffeln (darauf achten, dass sich keine Luftblasen in der Masse befinden) und abschließend mit einer Schicht Olivenöl bedecken damit kein Sauerstoff an das Pesto kommt und es die Farbe verliert.

Verwendung: als Sauce zu gegrillten Lammkoteletts oder anderem gegrillten Fleisch, Fisch, Gemüse, verrührt mit Mayonnaise & mehr Zitronensaft als Dip für Artischocken, klassisch mit Pasta, als garlic fries (Knoblauch-Pommes), mit etwas Butter zu einer himmlischen Kräuterbutter verknetet & auf einem Sonntagssteak schmelzen lassen, zu Spargel servieren, Knoblauchbrot… ach, ich werde hungrig.

Vin d’orange

Vin d'orange by the james kitchen
Vin d’orange, a photo by the james kitchen on Flickr.

January is the time for citrus fruit and especially Seville oranges. These small bitter oranges have quite a short season and need to be preserved either as English orange marmalade or even better as wine, the Provençal aperitif: vin d’orange.  Every family has their own recipe for this orange wine and their own traditions and twists to add but basically white or rosé wine is infused with the unbelievable fragrance & taste of these oranges, preserved with sugar and Eau de Vie then matured until summer. When it makes its appearance as a spectacular aperitif of orange sunshine with ice to a lazy lunch or evening meal, you will be grateful that you made a double batch because you will have “tasted” your Château (insert your name here) regularly – strictly for quality control purposes, of course.

Thankfully, we still have some left from last year (double batch!) when I spotted Seville oranges at the market and bought a lot (reason for: double batch!), ordered big glass jars, mashed up recipes and went alcohol shopping to start our own tradition and the first Château James. Most recipes cut the oranges in slices and macerate them for about 2 months though I found a quicker method used by the grandmother of the family, Mireille Durandeau, who ground the oranges which in my opinion allows the oranges to infuse the wine completely and much quicker. I changed it and blitzed them in a food processor a few times which makes this an even more rapid (and less messy) process and guarantees maximum flavour & a wonderful mimosa yellow-orange colour.

A not too heavy or strong tasting white wine (for example a Sauvignon blanc or Pinot grigio) or a light rosé wine from the Provence or Côte d’Azur are perfect and you need a clear and neutral spirit with at least 40° alcohol. We had Alcool special pour fruits spiritueux which is sold in every French Supermarket and is a neutral Eau de Vie for preserving fruit in alcohol, Vodka is also a fine alternative. Get a big glass jar which can hold about 4-5 litres (quarts) with a tight closing lid and no plastic, you do not want your hard work spoiled by solvents or a bouquet of poly-somethings.

Get started this week and enjoy your first glass – ahem, “taste” – by Valentines Day and buy some lovely mimosas at the same time.


Vin d’orange
makes about 4 litres, adapted from Lucy Vanel’s grandmother-in-law and mother-in-law

7-8 (about 1kg or 35oz) Seville oranges, organic or untreated
750g (26.5 oz) sugar
1 vanilla bean
1 cinnamon stick
0.5 litre (½ qt) French Alcool pour fruits or Eau de Vie or Vodka (a neutral spirit, 40°)
2 litres (2qt) white wine (Sauvignon blanc, Pinot grigio or else) or a light rosé wine from the Provence or Côte d’Azur


Wash and roughly cut the oranges, place in a food processor and blitz the fruit including peel, pips and all into small pieces. Make sure not to over-blend, you do not want to get a puree only small pieces that can be filtered out later. Fill the cut oranges with the sugar in a big glass jar with an airtight lid (I made a double batch and used a 5 litres and a 4 litres jar), add the vanilla and cinnamon and mix with the spirit. Fill up with white wine, close the lid and leave to macerate in a cool dark place for about a month. Filter the wine through a fine mesh sieve and decant into small bottles. Seal and ideally store for about 6 months until summer. We start “tasting” it pretty soon after bottling – which I recommend with one or two ice cubes in a small glass.


chewy cranberry-oat cookies

These are cookies are very big American cookies, the size of frying pans. The sort you get at an artisan, signature, we are roasting our own beans coffee shop. Exactly, right that one with the fantastic cake & pie display. Cookies like these are usually kept in a big jar next to the cash register and while you order your coffee to take to the beach on a chilly winter Sunday in the Bay Area to watch the Mavericks high waves rolling onto the beach (sigh) you succumb to the allure of these giant alluring discs. Or maybe you get the cherry biscotti. Next time.
So here we are: not in CA but longing for one of these days and I need a batch of these to say Thank you to our neighbour for helping us with our tire. Super soft like a pillow, chewy in the best of ways, dark brown sugar to add a more adult, dark ale molasses note, cranberries & oats for fruit and crunch. Purrfect.

Chewy Cranberry-Oat Cookies
makes 2 dozen giant cookies or 4 dozen smaller ones

1 cup (2 sticks or 228g) soft butter
1 ½ cups dark brown sugar
¼ honey or rice syrup
2 eggs
1 ½ teaspoons vanilla extract
1 ¼ cup plain flour
1 ½ teaspoon ground cinnamon
1 teaspoon baking soda
½ salt
3 cups Old-fashioned oats (German: kernige Haferflocken)
1 cup dried unsweetened cranberries

Preheat the oven to 175°C (350°F) or 160°C fan oven.

Beat the soft butter with the sugar & honey until soft and fluffy – either in a mixer or by hand. Stir in the eggs and vanilla. Measure the flour, cinnamon, baking soda and salt in a separate bowl and whisk so that the baking soda is evenly distributed. Add to the butter-egg mixture and stir slowly until combined. Add the cranberries and oats, combine again. Use a 3 tablespoon ice-cream scoop to place equal sized dollops onto baking sheets lined with parchment, make sure you have about 2 inches (5cm) distance between the dough balls. Press down lightly. Bake for about 12 minutes. For smaller cookies use a 1 tablespoon scoop and bake for 10 minutes or less. Take out and let them cool slightly before placing them onto a wire rack to cool completely.